Enkla Arduino LCD-spel! (2 / 3 steg)
Steg 2:

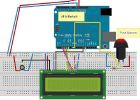
Nu kopiera och klistra in följande kod i Arduino IDE, ansluter Arduino till datorn, justera inställningarna (styrelse, port, etc.) Och ladda upp skissen till styrelsen. Tänk på det mina vara några saker som du behöver justera som avståndet. Om du har några problem sedan lämna en kommentar ner nedan kommer jag göra mitt bästa att hjälpa dig.
///////////////////////////////////////////////////////////////////////////////////////////////////
#include
LiquidCrystal lcd (8, 13, 9, 4, 5, 6, 7);
int lcd_key = 0;
int adc_key_in = 0;
#define btnRIGHT 0
#define btnLEFT 3
#define btnNONE 5
int read_LCD_buttons()
{adc_key_in = analogRead(0);
om (adc_key_in < 50) återvänder btnRIGHT;
om (adc_key_in < 650) återvänder btnLEFT;
återvända btnNONE;
}
byte mario1 [8] = {
B01110,
B11111,
B01110,
B11111,
B01110,
B01010,
B10001,
};
byte mario2 [8] = {
B01110,
B11111,
B01110,
B11111,
B01110,
B00100,
B00100,
};
void marioStand () {
LCD.write((byte)0);
}
void marioRun () {
lcd.setCursor(3,1);
LCD.write((byte)0);
Delay(300);
lcd.setCursor(3,1);
LCD.write((byte)1);
Delay(300);
}
void setup() {
LCD.BEGIN (16, 2);
lcd.createChar(0,mario1);
lcd.createChar(1,mario2);
}
void loop() {
lcd.setCursor(3,1);
lcd_key = read_LCD_buttons();
växel (lcd_key)
{
fall btnRIGHT:
{
marioRun();
lcd.scrollDisplayRight();
bryta;
}
fall btnLEFT:
{
marioRun();
lcd.scrollDisplayLeft();
bryta;
}
standard:
marioStand();
bryta;
}
}
Arduino LCD-spel

Historien klockan: Arduino LCD w / cap sensorer
Enkla Arduino Arm (Pan/Tilt)

Arduino LCD-termometer
Bärbar Arduino arcade spel
Arduino LCD-Counter
4-i-1 Arduino LCD sköld Kit
Snabb installationsguide till Arduino LCD 2004 med PCF8574
DIY trä fallet för Arduino LCD sköld

Arduino LCD knappsatsen sköld
Arduino knapp spel
Enkla Arduino trådlösa Mesh
Arduino skytte spel Arkad
Arduino Asteroid spel
Arduino ljus spel / inbyggd med fin men billiga kit
Arduino LCD knappsatsen sköld PONG!

4-i-1 Arduino LCD sköld Version 2

Enkla Arduino PIR rörelse detektor modul Demo
